Getting Productive With QGIS, Postgresql, PostGIS, and Google maps
Besides the inbuilt capabilities, its extensibility through plugins makes it a very powerful tool. - Having not used the system before, I wanted to give it a test to see if it could stand up to the claims and how easily it could do the tasks I needed. - While QGIS has several ways to achieve a similar result, including direct incorporation of Google and other maps providers with the 'Openlayers' plugin, the first test was to take points captured (in an external Postgresql database) from Google Maps, and add these points as a PostGIS layer in QGIS.
Bottom line: I am impressed !
The test platform used a common PostGIS (ver 2.1) extended Postgreql (ver 9.3.2 / 9.3.3) database as a backend to both QGIS (ver 2.0.1 / 2.2) and a Google Maps (API 3) application. The first test was done on an Asus X53E laptop with I5/8Gb RAM, running Windows 7 x64 Professional. This was then duplicated on an Asus Transformer T100 with Atom/2Gb RAM under Windows 8.1 32Bit and on the X53E under Ubuntu 13.10.
Setting up under Windows was a breeze with the Window's installers (use 'synaptic' under Ubuntu and the 'ubuntugis' unstable ppa) - Pgadmin3 comes with the Postgresql installer and is invaluable in making it easy to manipulate the Postgresql databases. For those with experience with MySQL, there is a bit to learn migrating to Posgresql, but it is not too steep a curve ... and there are plenty of help resources via the internet.
The Google Maps application used here was set up with a single Postgresql table (marker) with separate "lat" and "lng" (float(8) fields to collect the coordinate data as decimal degrees from Google Maps. A standard postgresql database table is not recognised as a PostGIS Layer ! ... sooo... a couple of important steps:
- Create a new Postgresql login role without 'superuser' rights e.g. 'mynewuser'
- Create a database with spatial extensions by using the Postgis template. - use Pgadmin3 .. or the psql shell if you are more adventurous.
- Add the "marker" table used for google maps capture to this new database (and point the google maps application to also use this new database) - really easy with Pgadmin3 (see below for a basic table structure)
CREATE TABLE marker
(
id serial NOT NULL,
name character varying(100),
address character varying(300),
lat double precision,
lng double precision,
type character varying(30),
CONSTRAINT marker_pkey PRIMARY KEY (id)
)
Easiest way to ensure access rights, is for your new 'login role' to be the 'owner' - if necessary, you can do this by -
ALTER TABLE marker OWNER TO mynewuser;
Alternatively, combine Steps 2 and 3 to directly enable PostGIS in your existing PostgreSQL database by running: (see Postgis.net)
-- Enable PostGIS (includes raster) - CREATE EXTENSION postgis;
and also if needed -- Enable Topology - CREATE EXTENSION postgis_topology;
- The PostGIS layer uses a single "geometry" field (default: 'the_geom
 rather than separate coordinate fields - this field needs to be added - the sql editor in Pgadmin3 can handle this for us. Add this code and execute in the editor -
SELECT AddGeometryColumn ('public','marker','the_geom',4326,'POINT',2); This assumes the 'public' Schema and 'SRID 4326' is used.
This solution was adapted from here - Note: DB Manager is in the standard QGIS plugin repository and does the job of the suggested FastSQLLayers. Also check the PostGIS manual for GeomFromEWKT.
The new table:
CREATE TABLE marker
(
id serial NOT NULL,
name character varying(100),
address character varying(300),
lat double precision,
lng double precision,
type character varying(30),
the_geom geometry(Point, 4326),
CONSTRAINT marker_pkey PRIMARY KEY (id)
)
 PostGIS table update
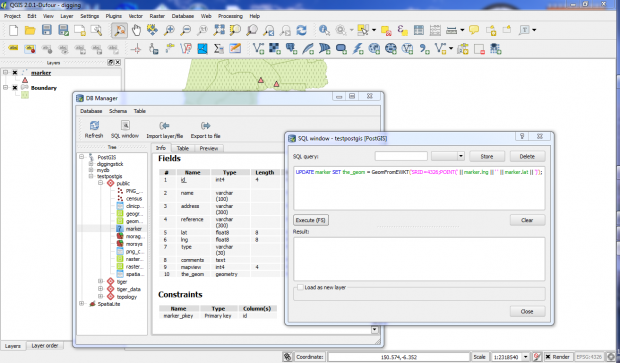
 - The new 'the_geom' field can be updated from the 'lat' and 'lng' fields with - either
UPDATE marker SET the_geom = ST_GeomFromEWKT('SRID=4326;POINT(' || marker.lng || ' ' || marker.lat || ''
or
UPDATE marker SET the_geom = ST_GeomFromTEXT('SRID=4326;POINT(' || marker.lng || ' ' || marker.lat || ''
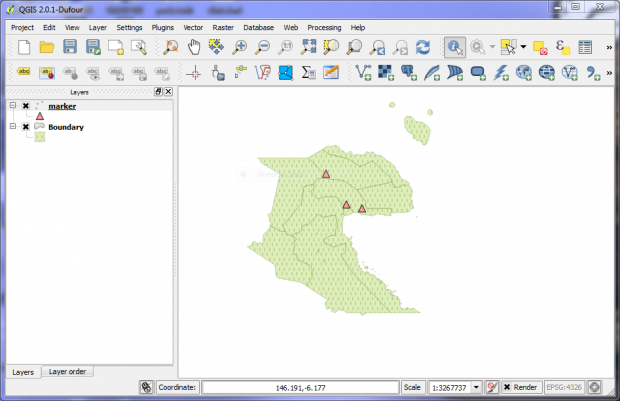
- The 'marker' table can now be added to QGIS as a PostGIS layer..... and there it is !!
- The PostGIS geometry field update is needed each time new coordinate data is added to the table via the Google Maps interface - This update can also be done from within QGIS using the SQL window in the DB Manager plugin.
As an aside: - what about the reverse? - how to get 'lat and long coordinates' from 'the_geom' in a PostGis table
To get Longitude
SELECT ST_X(the_geom) FROM table;
To get Latitude
SELECT ST_Y(the_geom) FROM table;
example to get output of coordinates with an 'id' - using a table called 'census'
SELECT id,ST_X(the_geom),ST_Y(the_geom) FROM census;
and .. to update the 'lat' and 'lng' coordinate columns in the 'marker' PostGIS table (from 'the_geom' when features are added to the 'marker PostGIS layer' in QGIS
UPDATE marker SET lng = ST_X(the_geom),lat = ST_Y(the_geom);
Learn more about this with our online module - Getting Productive with QGIS.
(Other useful software tools used in this exercise - notepad++, xampp (with postgresql enabled), phpmaker)
Tag: postgresql postgis qgis google map gis